


Learn how to operate a cathode-ray oscilloscope
APPARATUS: Cathode-ray oscilloscope, multimeter, and oscillator.
INTRODUCTION to CRO
The cathode-ray oscilloscope (CRO) is a common laboratory instrument that provides accurate time and amplitude measurements of voltage signals over a wide range of frequencies. Its reliability, stability, and ease of operation make it suitable as a general purpose laboratory instrument. The heart of the CRO is a cathode-ray tube see in schematically in Fig. 1.
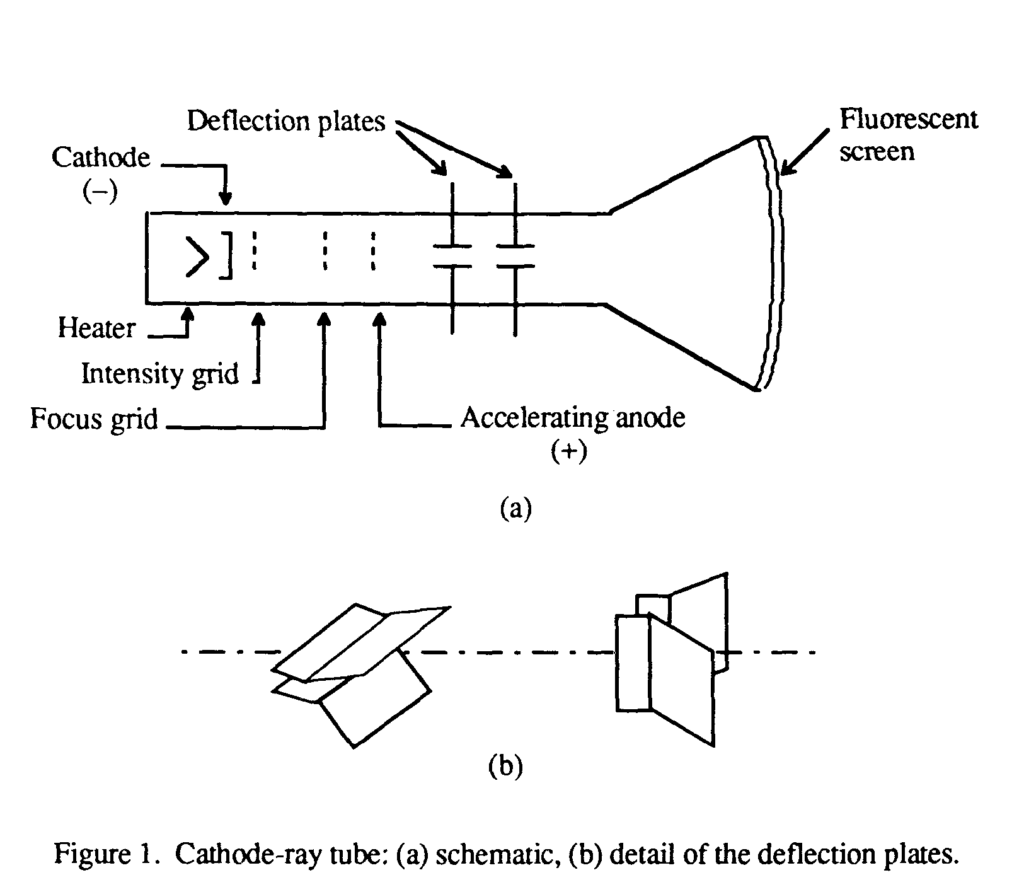
The cathode ray is a beam of electrons ,emits by the heated cathode (negative electrode) and accelerated toward the fluorescent screen. The assembly of the cathode, intensity grid, focus grid, and accelerating anode (positive electrode) is an electron gun. Its purpose is to generate the electron beam and control its intensity and focus.
Additional Information
Between the electron gun and the fluorescent screen are two pair of metal plates – one orients to provide horizontal deflection of the beam and one pair oriented ot give vertical deflection to the beam. The plates are thus refer to as the horizontal and vertical deflection plates. moreover The combination of these two deflections allows the beam to reach any portion of the fluorescent screen. then Wherever the electron beam hits the screen, the phosphor excits and light emits from that point. This coversion of electron energy into light allows us to write with points or lines of light on an otherwise darkened screen.
General Information
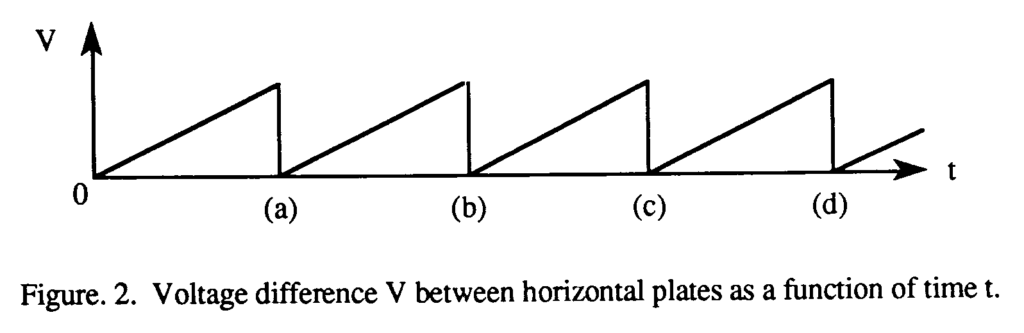
In the most common use of the oscilloscope the signal is first amplifies and impose to the vertical (deflection) plates to deflect the beam vertically and at the same time a voltage which increases linearly with time is apply to the horizontal deflection plates thus cause the beam to deflect horizontally at a constant rate. The signal impose to the vertical plates is thus displays on the screen as a function of time and The horizontal axis serves as a uniform time scale.
The linear deflection or sweep of the beam horizontally is accomplish by use of a sweep generator that is incorporated in the oscilloscope circuitry. The voltage output of such a generator is that of a sawtooth wave as shown in Fig. 2. Application of one cycle of this voltage difference, which increases linearly with time, to the horizontal plates causes the beam which deflects linearly with time across the tube face. When the voltage suddenly falls to zero, as at points (a) (b) (c), etc…., the end of each sweep – the beam flies back to its initial position. The horizontal deflection of the beam repeats periodically, the frequency of this periodicity is adjustable by external controls.
Cathode Ray Oscilloscope CRO Operation:
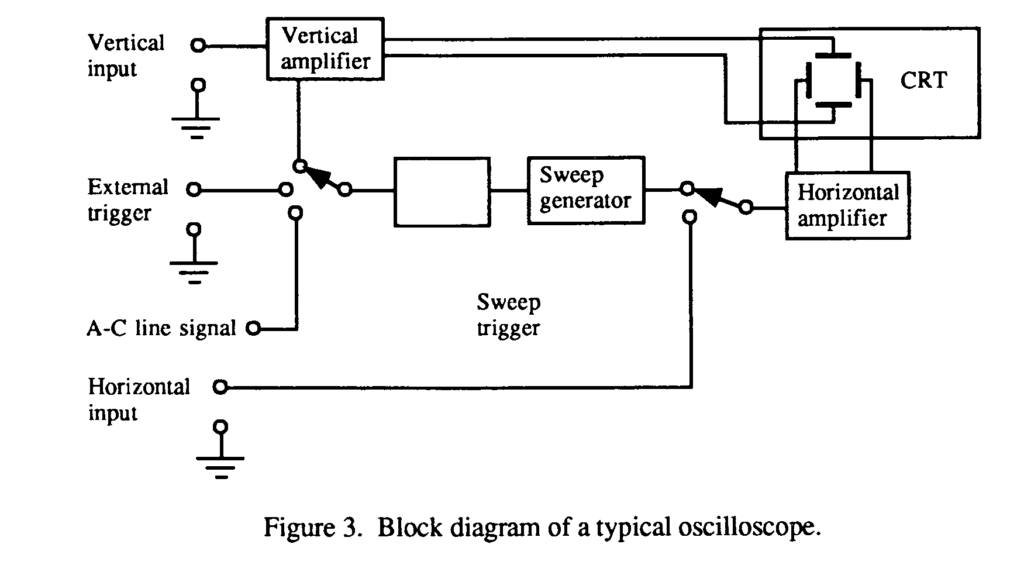
A simple block diagram of a oscilloscope is in Fig 3 In general, the instrument is operats in the manner The signal in display increases the amplitude by the vertical amplifier and impose to the verical deflection plates of the CRT. A portion of the signal in the vertical amplifier is impose to the sweep trigger as a triggering signal. however The sweep trigger then generates a pulse coincident with a selected point in the cycle of the triggering signal. This pulse turns on the sweep generator, initiating the sawtooth wave form. The sawtooth wave is amplifies by the horizontal amplifier and impose to the horizontal deflection plates
Cathode Ray Oscilloscope Controls
The controls available on most oscilloscopes provide a wide range of operating conditions and thus make the instrument especially versatile. Since many of these controls are common to most oscilloscopes a brief description of them follows.
CATHODE-RAY TUBE
Power and Scale Illumination: Turns instrument on and controls illumination of the graticule.
Focus: Focus the spot or trace on the screen.
Intensity: Regulates the brightness of the spot or trace
VERTICAL AMPLIFIER SECTION
Position: Controls vertical positioning of oscilloscope display.
Sensitivity: Selects the sensitivity of the vertical amplifier in calibrated steps.
Variable Sensitivity: Provides a continuous range of sensitivities between the calibrated steps. Normally the sensitivity is calibrate only when the variable knob is in the fully clockwise position.
AC-DC-GND: Selects desired coupling (ac or dc) for incoming signal applied to vertical amplifier, or grounds the amplifier input. Selecting dc couples the input directly to the amplifier selecting ac send the signal through a capacitor before going to the amplifier thus blocking any constant component.
HORIZONTAL-SWEEP SECTION
Sweep time/cm: Selects desired sweep rate from calibrated steps or admits external signal to horizontal amplifier.
Sweep time/cm Variable: Provides continuously variable sweep rates. Calibrated position is fully clockwise.
Position: Controls horizontal position of trace on screen.
Horizontal Variable: Controls the attenuation (reduction) of signal applied to horizontal aplifier through Ext. Horiz. connector.
TRIGGER
The trigger selects the timing of the beginning of the horizontal sweep.
Slope: Selects whether triggering occurs on an increasing (+) or decreasing (-) portion of trigger signal.
Coupling: Selects whether triggering occurs at a specific dc or ac level.
Source: Selects the source of the triggering signal.
INT – (internal) – from signal on vertical amplifier
EXT – (external) – from an external signal inserted at the EXT. TRIG. INPUT.
LINE – 60 cycle triger
Level: Selects the voltage point on the triggering signal at which sweep triggers. It also allows automatic (auto) triggering of allows sweep to run free (free run).
CONNECTIONS FOR THE OSCILLOSCOPE
Vertical Input: A pair of jacks for connecting the signal under study to the Y (or vertical) amplifier. The lower jack in grounds to the case.
Horizontal Input: A pair of jacks for connecting an external signal to the horizontal amplifier however The lower terminal graounts to the case of the oscilloscope.
External Tigger Input: Input connector for external trigger signal.
Cal. Out: Provides amplitude calibrated square waves of 25 and 500 millivolts for use in calibrating the gain of the amplifiers.
Accuracy of the vertical deflection is + 3%. Sensitivity is variable.
Horizontal sweep should be accurate to within 3%. Range of sweep is variable.
Operating Instructions for cathode ray oscilloscope:
(a) Power switch at off
(b) Intensity fully counter clockwise
(c) Vertical centering in the center of range
(d) Horizontal centering in the center of range
(e) Vertical at 0.2
(f) Sweep times 1
Plug line cord into a standard ac wall recepticle (nominally 118 V). Turn power on. Do not advance the Intensity Control.
Allow the scope to warm up for approximately two minutes, then turn the Intensity Control until the beam is visible on the screen.
WARNING:
Never advance the Intensity Control so far that an excessively bright spot appears. Bright spots imply burning of the screen. A sharp point spot of high intensity (great brightness) should not allow to remain fixed in one position on the screen for any length of time as damage to the screen may occur
Adjust Horizontal and Vertical Centering Controls. Adjust the focus to give a sharp trace. Set trigger to internal, level to auto.
PROCEDURE for Oscilloscope
Set the signal generator to a frequency of 1000 cycles per second. Connect the output from the gererator to the vertical input of the cathode ray oscilloscope. Establish a steady trace of this input signal on the scope. Adjust (play with) all of the scope and signal generator controls until you become familiar with the functionof each. The purpose fo such “playing” is to allow the student to become so familiar with the oscilloscope that it becomes an aid (tool) in making measurements in other experiments and not as a formidable obstacle.
Measurements of Voltage:
Consider the circuit in Fig. 4(a). The signal generator is to produce a 1000 hertz sine wave. The AC voltmeter and the leads to the verticle input of the oscilloscope connects across the generator’s output. By adjusting the Horizontal Sweep time/cm and trigger, a steady trace of the sine wave may be displayed on the screen. The trace represents a plot of voltage vs. time, where the vertical deflection of the trace about the line of symmetry CD is proportional to the magnitude of the voltage at any instant of time
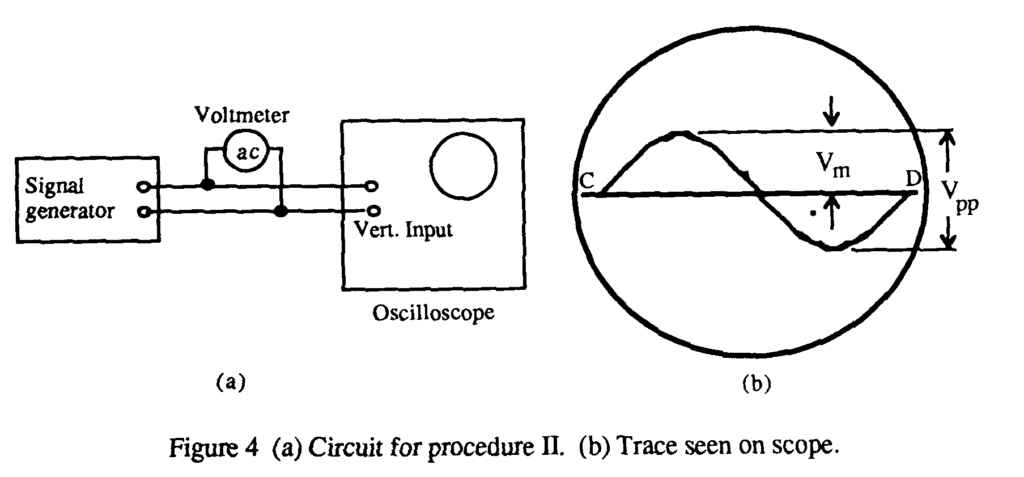
3. To determine the size of the voltage signal appearing at the output of terminals of the signal generator
an AC (Alternating Current) voltmeter connects in parallel across these terminals (Fig. 4a). The AC voltmeter is designed to read the dc “effective value” of the voltage. This effective value is also known as the “Root Mean Square value” (RMS) value of the voltage.
The peak or maximum voltage seen on the scope face (Fig. 4b) is Vm volts and is represents the distance from the symmetry line CD to the maximum deflection. The relationship between the magnitude of the peak voltage displays on the scope and the RMS voltage (VRMS) read on the AC voltmeter is
VRMS = 0.707 Vm (for a sine or cosine wave).
Thus, Agreement is expected between the voltage reading of the multimeter and that of the oscilloscope. For a symmetric wave (sine or cosine) the value of Vm may be taken as 1/2 the peak to peak signal Vpp
The variable sensitivity control a signal may be used to adjust the display to fill a concenient range of the scope face. In this position, the trace is no longer calibrated so that you can not just read the size of the signal by counting the number of divisions and multiplying by the scale factor. However, you can figure out what the new calibration is an use it as long as the variable control remains unchanged.
4. Frequency Measurements:
When the horizontal sweep voltage is applied, voltage measurements can still be taken from the vertical deflection. Moreover, the signal is displayed as a function of time. If the time base (i.e. sweep) is calibrated, such measurements as pulse duration or signal period can be made. Frequencies can then be determined as reciprocal of the periods.
Set the oscillator to 1000 Hz. Display the signal on the CRO and measure the period of the oscillations. Use the horizontal distance between two points such as C to D in Fig. 4b.Set the horizontal gain so that only one complete wave form is displayed.
Then reset the horizontal until 5 waves are seen. Keep the time base control in a calibrated position. Measure the distance (and hence time) for 5 complete cycles and calculate the frequency from this measurement. Compare you result with the value determined above.
Repeat your measurements for other frequencies of 150 Hz, 5 kHz, 50 kHz as set on the signal generator.
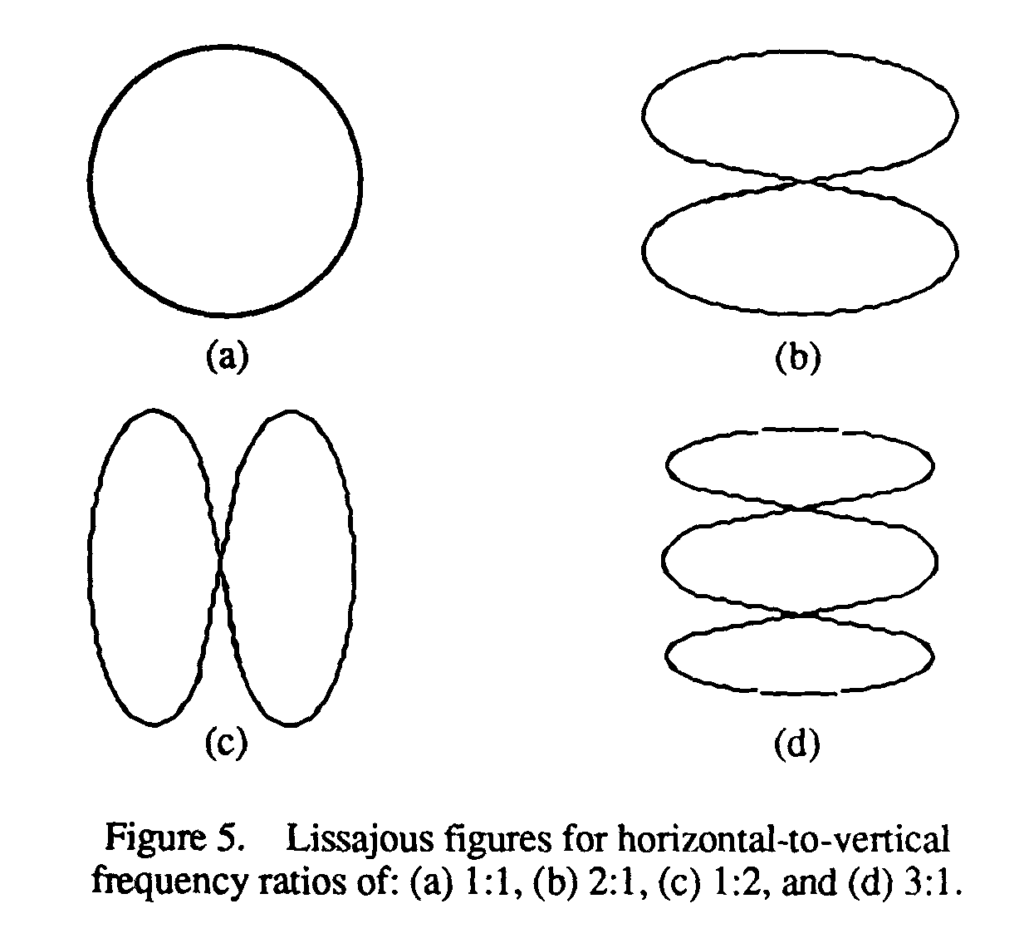
5. Lissajous Figures:
When sine-wave signals of different frequencies are input to the horizontal and vertical amplifiers a stationary pattern is formed on the CRT when the ratio of the two frequencies is an intergral fraction such as 1/2, 2/3, 4/3, 1/5, etc. These stationary patterns are known as Lissajous figures and can be used for comparison measurement of frequencies.
Use two oscillators to generate some simple Lissajous figures like those shown in Fig. 5. You will find it difficult to maintain the Lissajous figures in a fixed configuration because the two oscillators are not phase and frequency locked. Their frequencies and phase drift slowly causing the two different signals to change slightly with respect to each other
Testing what you have learned
Your instructor will provide you with a small oscillator circuit. Examine the input to the circuit and output of the circuit using your oscilloscope. Measure such quantities as the voltage and frequence of the signals. Specify if they are sinusoidal or of some other wave character. If square wave, measure the frequency of the wave. Also, for square waves, measure the on time (when the voltage is high) and off time (when it is low).
Perform virtually:- click here
Virtual simulator :- click here
For more posts :- click here
- Amazon is Hiring | Apply before last date
- Harman is Hiring | Freshers must apply
- Treebo Hotels is Hiring | Freshers must apply
- IBM Software Developer Intern 2024 | Freshers must apply
- Deloitte Internship 2024 | Apply before last date